Install Red Hat OpenShift Local on your own machine to test your work before deployment
Having a lab where you can test your application or configuration before sending it to a production environment is an invaluable resource to ensure deployments are smooth and production is stable.
It’s no different when it comes to container orchestration. Whether your production environment is a small cluster, a large on-premises environment, or even a Red Hat OpenShift Service on AWS (ROSA) cluster on the cloud, ensuring your configuration is sound by properly testing it in a local lab environment brings the same benefits.
OpenShift Local allows developers to deploy a small, single-node OpenShift cluster on their own machines so that they can test their application locally. They can also see how it would behave when running in a container orchestrator.
In this article I’ll show you how to install OpenShift Local on your local Linux machine. You can also install OpenShift Local with other operating systems. For more information consult the official documentation.
Get started with OpenShift Local
For Linux, OpenShift Local deployments are supported in the 2 latest releases of Fedora and Red Hat Enterprise Linux. You can also install it on other Linux distributions if you have the following requirements:
- Network manager
- Libvirt
- Qemu (
qemu-kvm)
To get started with OpenShift Local, download the crc tool from the Red Hat Console. If you don’t have a Red Hat account, you can create one for free with the Red Hat Developer program.
After you log in, download both the installation package and the pull secret from the Red Hat OpenShift Local screen:
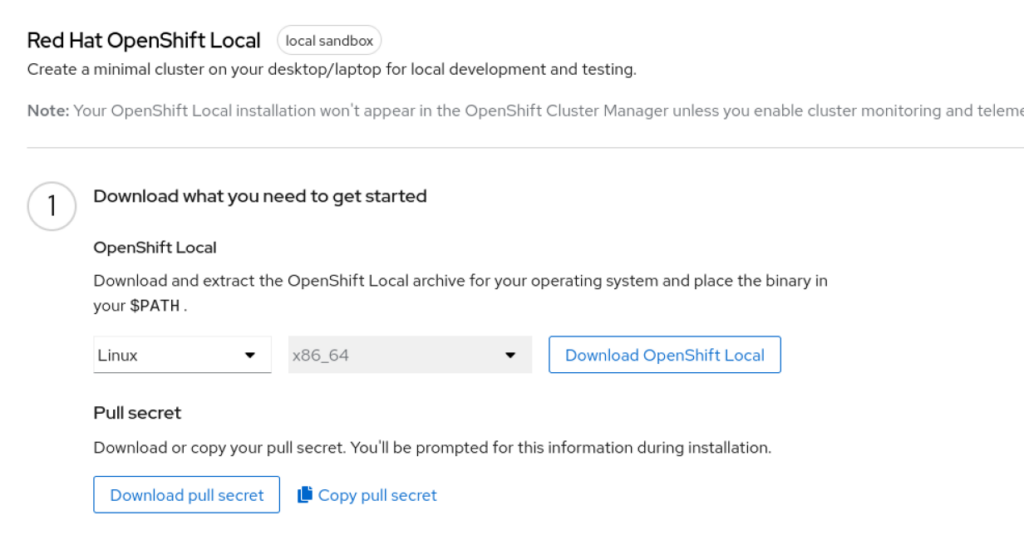
When the download finishes, decompress the crc tool and move it to a location within your PATH. If you prefer to keep everything local to your user account, then create a directory and add it to your PATH like this:
|
1 2 3 4 5 6 7 8 9 10 11 12 13 14 15 16 17 18 19 |
$ cd ~/Downloads/ $ tar xvf crc-linux-amd64.tar.xz crc-linux-2.16.0-amd64/ crc-linux-2.16.0-amd64/LICENSE crc-linux-2.16.0-amd64/crc $ mkdir -p ~/local/bin $ mv crc-linux-*-amd64/crc ~/local/bin/ $ export PATH=$HOME/local/bin:$PATH $ crc version CRC version: 2.16.0+05b62a75 OpenShift version: 4.12.9 Podman version: 4.4.1 $ echo 'export PATH=$HOME/local/bin:$PATH' >> ~/.bashrc |
OpenShift Local runs as a single node cluster in a virtual machine (VM) on your system. Because of this, it has some limitations compared to a real production environment:
- Control plane and worker node run on the same machine
- The cluster is ephemeral
- The cluster does not support automatic updates
For other differences, consult the documentation.
Set up your machine
Before running your local OpenShift cluster, you need to set up your machine by using the crc setup.
The crc setup uses the directory $HOME/.crc to cache the virtual machine images required by the install. Ensure you have at least 35GB of free space in your home directory. If you use LVM, you can create a logical volume for it and mount .crc before running the command.
When you run the setup for the first time, crc asks whether you want to provide anonymous data to help improve the product. To prevent this question from showing, you can configure your option upfront using crc config:
|
1 2 3 4 |
$ crc config set consent-telemetry <yes/no> $ crc config view - consent-telemetry : yes |
Now you can run the setup to configure your machine:
|
1 |
$ crc setup |
You need to provide your sudo password allowing crc to add some network configuration to the NetworkManager so that you can connect to your cluster when it’s running.
At this point, crc downloads and decompresses the virtual machine image for your local cluster. This may take a long time depending on your network and disk speed.
Start OpenShift Local
The crc setup command configures your system to run OpenShift and caches the VM image in $HOME/.crc. However, it does not start the cluster automatically. At this point you could start the cluster with the default configuration. If your machine has more resources and you want to increase the resources available for your OpenShift cluster, you can adjust the VM configuration—like the number of CPUs or RAM—using crc config.
The default configuration creates a VM with 4 virtual CPUs and 9GB of RAM. This is enough for many cases but you may require more resources depending on your application requirements. For example, to increase the number of virtual CPUs to 8 and the memory to 16GB, run crc config like this:
|
1 2 3 4 5 6 7 8 |
$ crc config set cpus 8 $ crc config set memory 16384 $ crc config view - consent-telemetry : yes - cpus : 8 - memory : 16384 |
Now, start your cluster with the command crc start. You can also pass the full path to the pull-secret file you downloaded before in the command line to avoid having to paste it during the install:
|
1 |
$ crc start -p ~/Downloads/pull-secret |
The crc start command creates the VM and starts the cluster. You can see the VM resources by using virsh:
|
1 2 3 |
$ virsh -c qemu:///system dumpxml crc | grep -e vcpu -e "memory unit" <memory unit='KiB'>16777216</memory> <vcpu placement='static'>8</vcpu> |
After a few minutes, the cluster is up and running and crc prints the connection information:
|
1 2 3 4 5 6 7 8 9 10 11 12 13 14 15 16 |
Started the OpenShift cluster. The server is accessible via web console at: https://console-openshift-console.apps-crc.testing Log in as administrator: Username: kubeadmin Password: ahYhw-xJNMn-NyxMT-47t22 Log in as user: Username: developer Password: developer Use the 'oc' command line interface: $ eval $(crc oc-env) $ oc login -u developer https://api.crc.testing:6443 |
Access your new cluster
With your OpenShift Local cluster up and running, you can access it to deploy applications. When you ran crc setup, it also downloaded additional command-line tools like oc so that you can connect to your cluster from the command line. To use these tools, you need to set up your environment to make sure they can find your cluster:
|
1 |
$ eval $(crc oc-env) |
Then, connect to your cluster as administrator using kubeadmin with the password generated by the crc setup command:
|
1 |
$ oc login -u kubeadmin https://api.crc.testing:6443 |
You can now access cluster information. For example, confirm that you’re running a single node that works both as control plane and worker node using the command oc get nodes:
|
1 2 3 |
$ oc get nodes NAME STATUS ROLES AGE VERSION crc-8tnb7-master-0 Ready control-plane,master,worker 20d v1.25.7+eab9cc9 |
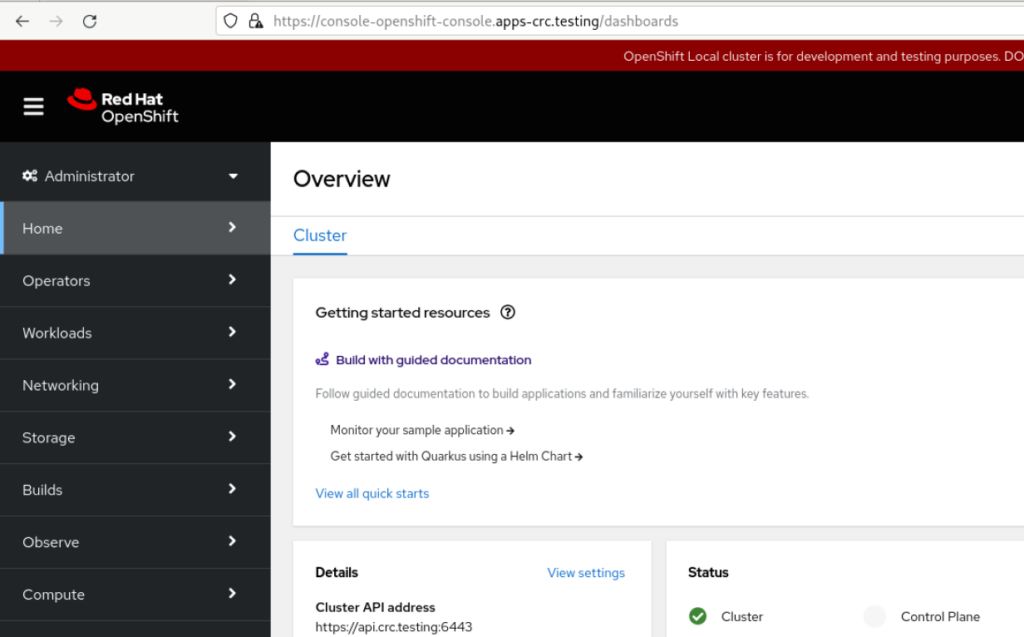
If you prefer to use the graphical console, you can access it by pointing your browser to https://console-openshift-console.apps-crc.testing:
What’s next
OpenShift Local provides a quick and easy way to set up a local OpenShift cluster on your desktop or laptop. This allows you to test your applications and configuration parameters before sending them to production. It’s also a great option to learn or practice OpenShift skills that will be useful in real production environments.
Now that your cluster is running, I’ll show you in my next article how to deploy a sample application on it.
Originally publish on April 24, 2023 at https://www.redhat.com/sysadmin/install-openshift-local


2 Comments
Tadeu · 2023-08-06 at 03:25
Nice article.
After every steps I got this message:
~|⇒ oc login -u kubeadmin https://api.crc.testing:6443
zsh: bad CPU type in executable: oc
*I’m running on a MacBook Pro M2, 2022.
Tadeu · 2023-08-06 at 03:36
This solved to me:
~|⇒ /usr/sbin/softwareupdate --install-rosetta --agree-to-license